

Welcome back to the Koopman DIY Project Book! A new deck will make a great addition to your house this summer. It’s a great place to entertain guests, let the kids play, or just chill out on a lazy summer afternoon. You might be intimidated by the thought of building a deck if you’ve never done it before, but don’t worry! It doesn’t have to be as hard as it looks if you have two things: Good resources and good materials. Here at Koopman we have both! Don’t hesitate to stop by a store. call, or email us with questions if you feel like you need any extra help on this project. Let’s not waste anymore time and get building this deck!
Pro tip: This blog will cover how to construct a ground level deck that is away from the side of your house, and does not cover raised freestanding decks.
Total Cost: $2500-$4500 (Depending On Materials)
SUPPLY LIST:
- Six 12-foot long 2×8 pressure-treated boards
- 30 8-foot long 2×8 pressure-treated boards
- 41 16-foot long 2×6 composite deck boards (we recommend getting extra, 45-50 should do it)
- 70 joist hangers
- Eight 3-1/2″ post anchor bolts
- Chalk linE
- 24 bags of Quick Set Concrete
- Buckets for mixing water
- 8 Sonotubes 12″ in diameter and 24″ long
TOOLS
- Circular saw
- Cordless drill with battery and magnetic screw tip
- Hammer
- Level
- Line level
- Measuring tape
- Palm nailer
- Pencil
- Post hole diggers
- Power miter box
- Safety glasses
- Shovels
- String line
STEP ONE: LAYING THE BASE

Laying string line is a great way to check angles before building is started
Begin by laying the perimeter of your deck using a string line. Tie stakes of in a 12′ x 24′ perimeter and tie your string line around the stakes.
Once the perimeter is marked it’s time to lay the concrete footers. Dig a hole at each of the four corners 12 inches in diameter and 24 inches deep. Dig 4 more holes that are 8 feet in from the corners on the long (24′) sides of the perimeter. Drop a Sonotube into each one and keep them level. We will be setting the band boards directly on top of the concrete so it is important that the Sonotubes stand level.
Pour three bags of concrete into each hole and add water. With quick-set concrete you don’t need to mix it before hand so mix it in the hole and level off the top of the concrete with the top of the Sonotubes. Wait 30 minutes for the concrete to set. Place your post anchor bolts in the top of the concrete as it dries. Be sure to leave enough of the anchor above the concrete to bolt into the band boards.
While waiting, pull the string line.
Pro tip: Before you start digging, have underground lines (water, gas, power, communication, etc.) located. Call the North America One Call Referral Service (1-888-258-0808). It’s free and required by law.
STEP TWO: BAND BOARDS AND JOISTS
2A: BAND BOARDS
Starting on either 12 foot side side lay a 12′ 2×8 between the two concrete feet. Bolt each end into the post anchor bolts that are affixed on top of the concrete. Do the same on the opposite side.
Now take an 8′ 2×8 and lay it along the 24 foot side, from the corner foot to an inside foot. Bolt in this board and then, starting from the far corner on the same side, repeat the process. Now measure and cut another 8′ 2×8 to fit in between the two boards you just laid and bolt it in. Repeat on the other side.
2B: JOISTS
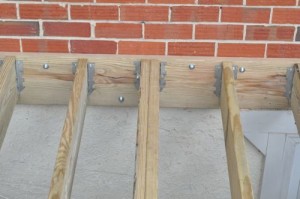
Using Joist fasteners helps strengthen the deck and are always recommended.
Take your remaining four 12′ 2×8’s and pair them off. Lay each pair between the inner concrete feet and bolt them to the band boards. These double beams will help to strengthen your deck.
Take your 8′ joints and begin to nail them in between the double beams and the band boards. Then us
ing your joist fasteners fasten the joist into the band boards and the double beams on the inside. Measure each new joist off at 16″ from center to center and repeat until all available space has been used. Repeat this on the other side of your deck as well.
For the center section in between the two double beams use the joist fasteners to lock everything into place. Starting at 8″ from the band boards nail in and fasten the first joist, and then continue with 16″ centers for every other joist. (This helps distribute the weight on the double beams).
STEP THREE: LAYING THE DECKING

A picture frame border with a different style of deck board
Take a 16′ 2×6 decking board and cut it to 12′, and then lay it across either of the 12 foot ends of the deck. Use a circular saw to cut the ends of this board inwards at at 45° angle. Use your cordless drill or impact driver to screw in this board at the intersection of every joist. Now take a 16′ board and cut one end at a 45° angle and lay it along one of the 24 foot edges of the deck so that the edges of this new board and the current 12′ meet. Cut another board at 8′, make a 45° angle and place the uncut edge running from your 16′ board to the end of the deck.
Pro tip: This creates a “picture frame” around the outside of your deck and gives it a great finished look while providing a frame for your inner pieces. for now we’ll only lay the 2 sides of the frame, you’ll see why later.
Now cut another 16′ decking board with a 45° angle and lay that edge flush in the corner you created. this board will be a reference board for the rest of your deck, so make sure you get it in at exactly 45°! Use a speed square for this part to measure! Screw this board in with 2 screws on every joist and ready the next board.

An alternative method to adding gaps between boards with a thin piece of wood.
Before we lay the next board in we need to create a tiny gap between boards. Take a standard 8d nail and nail it through a piece of scrap wood. Make two more of these and place them between your last laid board and your new board at either end and in the center. This will create an optimal gap between boards and makes consistency super easy. Use this for every new board laid.
Make rough cuts along the edge of your boards leaving about a 2″ overhang on the unframed side of the deck so that you can get your boards ready to be cut later.
Once you have finished laying all the decking board we have to snap a chalk line to cut the extra board. Measure 6″ in from the edge of the band board and snap a chalk line on top of your decking board. With a circular saw, cut off the overhanging board. Now repeat the earlier framing steps and screw your frame into the band board!
WRAP UP
Since this deck is ground level you don’t need to worry about installing hand rails around the perimeter. Your deck is done! If you wanted to apply a sealant (recommended) or stain your deck then now is the time to do it. Otherwise it’s time to drag out the furniture, light up the grill, and enjoy your new deck!
This isn’t an easy project for a newcomer and we know it, that’s why Koopman Lumber’s highly trained staff is available every day of the week. Click here to find the store closest to you and then set an appointment with our in house experts. We have the tools, materials, and experience you need to help get your deck built. You can also check us out online at Koopmanlumber.com and call any of our locations during store hours.
We hope you loved this Project Book blog and we’ll see you next time!


